

ANDROID DEBUG BRIDGE
What is ADB?
ADB, Android Debug Bridge, is a command-line utility included with Google’s Android SDK. ADB can control your device over USB from a computer, copy files back and forth, install and uninstall apps, run shell commands, and more.
Step One: Set Up the Android SDK
Head to the Android SDK download page and scroll down to “SDK Tools Only”, which is a set of tools that includes ADB. Download the ZIP file for your platform and unzip it wherever you want to store the ADB files–they’re portable, so you can put them anywhere you want.
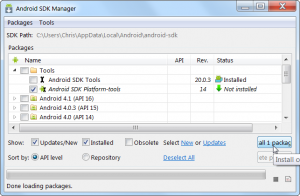
Start the SDK Manager EXE and deselect everything except “Android SDK Platform-tools”. If you are using a Nexus phone, you may also want to select “Google USB Driver” to download Google’s drivers. Click the Install button. This downloads and installs the platform-tools package, which contains ADB and other utilities. When it’s finished, you can close the SDK manager.
Step Two: Enable USB Debugging on Your Phone
 To use ADB with your Android device, you must enable a feature called USB debugging. Open Settings icon, and select “About Phone”. Scroll all the way down and tap the “Build Number” item seven times. You should get a message saying you are now a developer.
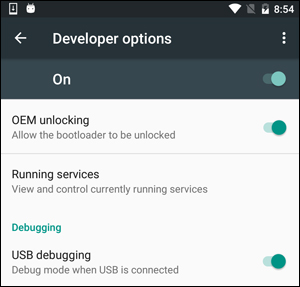
Head back to the main Settings page, and you should see a new option near the bottom called “Developer Options”. Open that, and enable “USB Debugging”.
Later on, when you connect your phone to your computer, you’ll see a popup entitled “Allow USB Debugging?” on your phone. Check the “Always allow from this computer” box and tap OK.
Step Three: Test ADB and Install Your Phone’s Drivers (if Needed)
Open the folder that you installed the SDK tools in and open the platform-tools folder. This is where the ADB program is stored. Hold Shift and right-click inside the folder. Choose “Open Command Window Here”.

To test whether ADB is working properly, connect your Android device to your computer using a USB cable and run the following command:

You should see a device in the list. If your device is connected but nothing appears in the list, you’ll need to install the appropriate drivers.
MY DEVICE IS NOT SHOWING UP!
WHAT DO I DO?!
Your phone’s manufacturer may provide a downloadable driver package for your device. So head to their website and find the drivers for your device–Motorola’s are here, Samsung’s are here, and HTC’s come as part of a suite called HTC Sync Manager. You can also search XDA Developers for driver downloads without the extra software.
You can also try installing the Google USB Driver from the Extras folder in the SDK Manager window, as we mentioned in the first step. This will work with some phones including Nexus devices.

If you use Google’s USB driver, you may have to force Windows to use the installed drivers for your device. Open the Device Manager (click Start, type Device Manager, and press Enter), locate your device, right-click it and select Properties. You may see a yellow exclamation mark next to the device if its driver isn’t installed properly.

On the Driver tab, click Update Driver.

Use the Browse my computer for driver software option.

You’ll find the Google USB Driver in the “Extras” folder where you installed your Android SDK files. Select the google\usb_driver folder and click Next.

Once you’ve installed your device’s drivers, plug in your phone and try the adb devices command again:
If all went well, you should see your device in the list, and you are ready to start using ADB!
Step Four (Optional): Add ADB to Your System PATH
RELATED: How to Edit Your System PATH for Easy Command Line Access in Windows
As it stands, you have to navigate to ADB’s folder and open a Command Prompt there whenever you want to use it. However, if you add it to your Windows System PATH, that won’t be necessary–you can just type adb from the Command Prompt to run commands whenever you want, no matter what folder you’re in.
The process is a bit different on Windows 7 and 10, so check out our full guide to editing your System PATH for the steps required to do this.
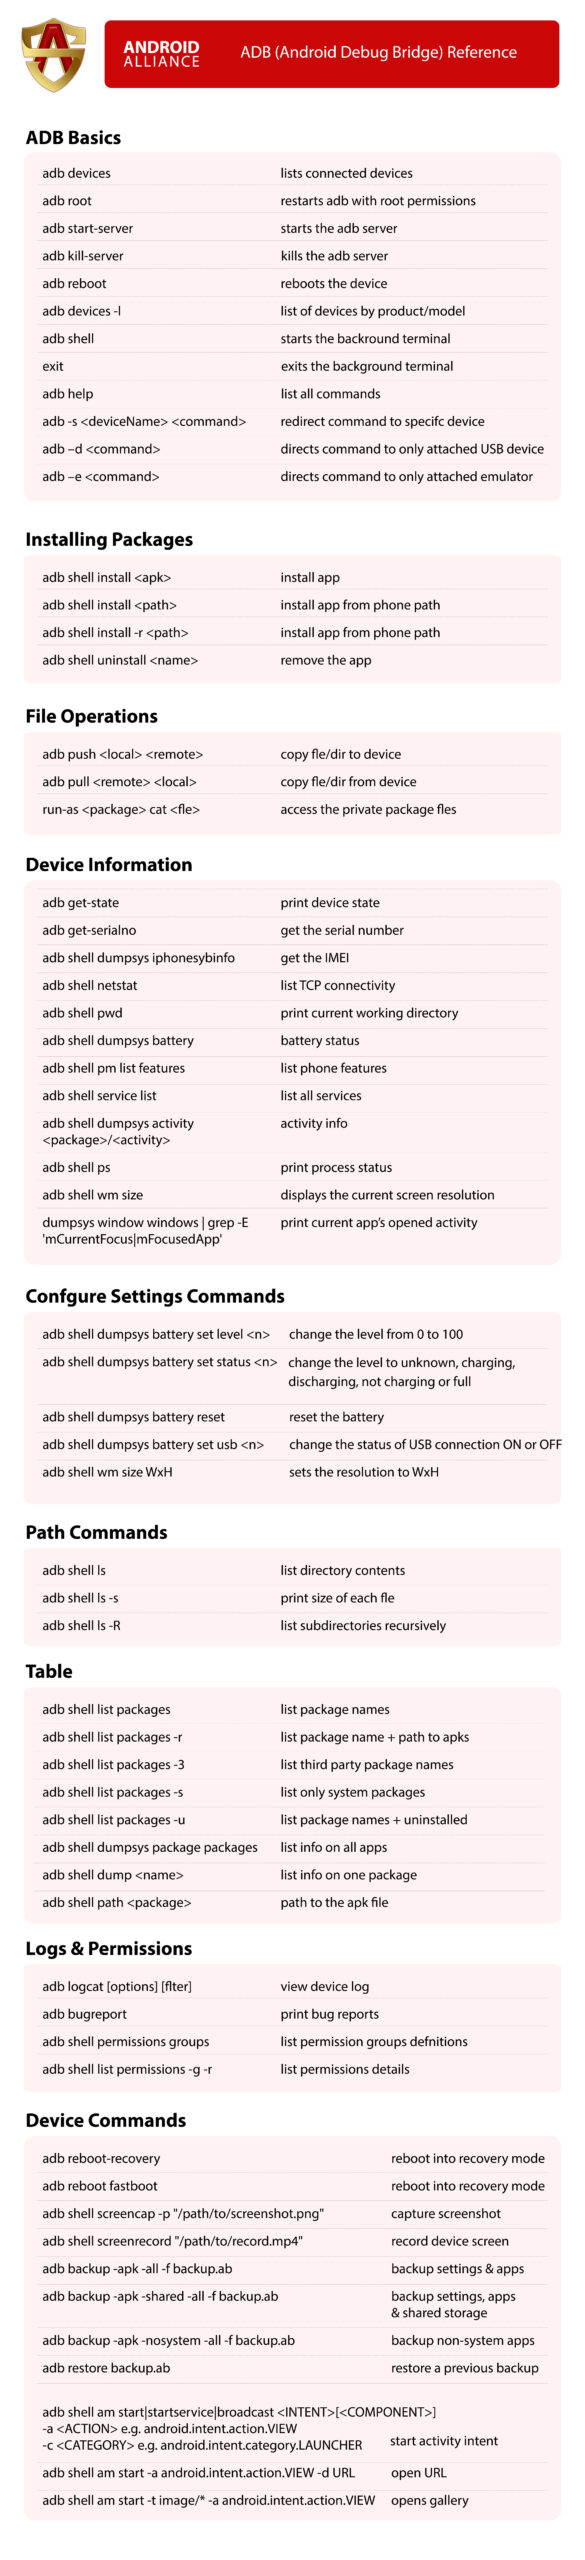
ADB Cheat Sheet
Read this article for a full guide on how to set Alliance Shield as Device Owner using ADB for PC or QR code